> ## Documentation Index
> Fetch the complete documentation index at: https://docs.eximpe.com/llms.txt
> Use this file to discover all available pages before exploring further.
# S2S UPI Intent
> Enable direct UPI payments without redirection using EximPe’s server-to-server UPI intent flow
# Introduction
The Server-to-Server (S2S) UPI Intent integration eliminates redirection hops by initiating transactions from your backend. Deliver a seamless checkout experience while maintaining control and confidence for your customers.
Initiate transactions directly from your server to improve user experience
Call the Initiate Payment API when the user selects an app (Mobile) or scans a QR code (Desktop)
Receive asynchronous status updates via server-to-server callbacks
### Intent Invocation
Intent invocation is simply the act of packaging your UPI payment details (amount, payee VPA, reference, etc.) into a deep-link URI and then launching the user’s UPI app directly from your front end. With a **specific intent**, you target a known app (e.g. Google Pay), while a **generic intent** lets Android show an app picker (on iOS it falls back to the default handler), all without bouncing users through extra web redirects.
## Prerequisites
Before you begin, ensure you have:
* **Credentials**: Your Client ID and Client Secret
* **Domain Whitelist**: Whitelisted your website domain for integration
* **Webhook URL**: A secure endpoint to receive payment status updates
* **Callback URL**: A publicly accessible URL configured in your EximPe dashboard for server-to-server callbacks.
* **cURL or HTTP Client**: Capability to make HTTPS `POST` and `GET` requests from your server.
* **UPI Knowledge**: Familiarity with UPI intent URL parameters and encoding.
The following steps allow you to integrate the server-to-server UPI intent:
1. **User selects UPI App (Mobile) or QR Code (Desktop)** on your frontend.
2. **Frontend calls your Backend** to initiate the payment.
3. **Backend calls EximPe Initiate Payment API** to get the `intent_uri`.
4. **Backend returns `intent_uri`** to the Frontend.
5. **Frontend invokes the UPI Intent** on the customer’s device.
6. **Check UPI transaction status** via API or Webhook.
## Step 1: Payment Page UI
Design your payment page to allow users to select their preferred UPI method.
#### Desktop (PC)
On desktop browsers, prepare a container to display a **QR Code**. When the user proceeds, you will generate this QR code from the intent URI.
#### Mobile (Android & iOS)
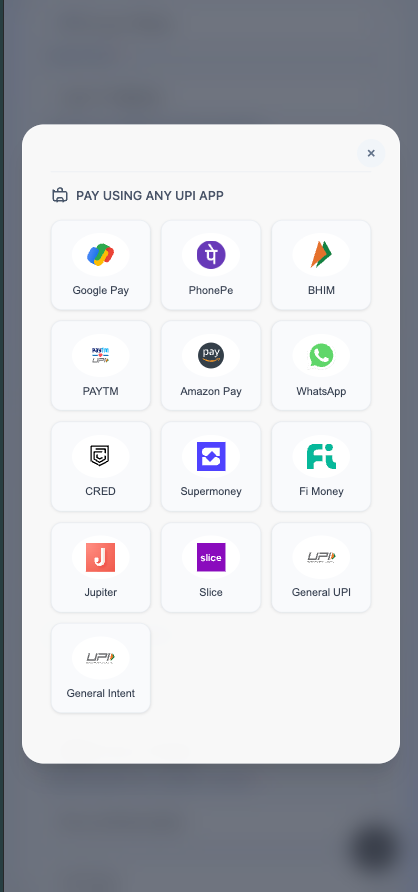 For mobile devices, design a list of popular UPI apps (like Google Pay, PhonePe, Paytm) for the buyer to select from. This provides the best user experience.
## Step 2: Initiate Payment
When the user clicks on a specific UPI app icon (e.g., Google Pay) on mobile or selects "Show QR" on desktop, your backend should call this API to generate the `intent_uri`.
#### Sample UPI Intent Request Body
```json theme={null}
{
"amount": "1000.00",
"collection_mode": "s2s",
"upi_flow_type": "intent",
"currency": "INR",
"reference_id": "S2SI_U8MEIT",
"mop_type": "upi",
"buyer": {
"name": "John Doe",
"email": "john.doe@example.com",
"phone": "+919876543210",
"address": {
"line_1": "123 Main Street",
"line_2": "Apt 4B",
"city": "City",
"state": "State",
"postal_code": "123456"
},
"ip_address": "192.168.1.100",
"user_agent": "Mozilla/5.0 (Windows NT 10.0; Win64; x64) AppleWebKit/537.36 (KHTML, like Gecko) Chrome/91.0.4472.124 Safari/537.36"
},
"product": {
"name": "Sample Product",
"description": "This is a sample product description",
"hs_code": "98051000",
"hs_code_description": "Portable automatic data processing machines",
"type_of_goods": "physical_goods"
},
"invoice": {
"number": "INV_V9TZZ3",
"date": "2025-07-08"
}
}
```
For the S2S UPI Intent request, you must include these additional parameters beyond the standard checkout fields:
* `collection_mode`: must be set to `"s2s"`
* `upi_flow_type`: must be set to `"intent"`
* `buyer.ip_address`: the customer’s device IP address
* `buyer.user_agent`: the customer’s browser or app user-agent string
### S2S UPI Intent Response
```json theme={null}
{
"success": true,
"message": "S2S UPI Request created successfully",
"data": {
"intent_uri": "pa=kk.payutest@hdfcbank&pn=&tr=403993715534292371&tid=PPPL403993715534292371080725205418&am=1000.00&cu=INR&tn=UPIIntent",
"order_id": "OD2000992103"
}
}
```
For S2S UPI Intent mode, the response includes:
* `order_id`: Unique order identifier
* `intent_uri`: UPI intent link that can be used to open UPI apps directly
**Explanation of URL Arguments**
| Argument | Example Value | Required | Description |
| -------- | --------------- | -------- | ------------------------------------------------------------------------------------------------ |
| `pa` | `merchant@bank` | Yes | Payee VPA (Virtual Payment Address) — the merchant's UPI ID that will receive the payment |
| `pn` | `Merchant Name` | Yes | Payee Name — the display name of the merchant |
| `am` | `100.00` | No | Amount — the payment amount (decimal, up to two places) |
| `cu` | `INR` | Yes | Currency — must be `INR` for Indian rupees |
| `tr` | `TXN12345` | Yes | Transaction Reference ID — unique identifier for this transaction (for reconciliation) |
| `tid` | `TXNID98765` | No | Transaction ID — a unique transaction ID (sometimes required by specific apps, e.g., Google Pay) |
| `tn` | `Order Payment` | No | Transaction Note — a short note or description for the payment |
## Step 3: Invoke UPI Intent
The method for invoking a UPI payment depends on the customer's device and operating system.
#### Desktop (PC)
On desktop browsers, use the `intent_uri` to generate a **QR Code**. The user can then scan this code with their mobile UPI app to complete the payment.
**Implementation:**
1. Prefix the `intent_uri` with `upi://pay?`
2. Use a QR code generation library or API to convert the full URI into a QR code image.
3. Display the QR code prominently with instructions like "Scan to Pay".
***PC Specific App Format***:
```text theme={null}
upi://pay?
```
**Examples:**
```text theme={null}
upi://pay?pa=merchant@bank&pn=Merchant&am=1.00&cu=INR&tr=TXN123
```
#### Mobile (Android & iOS)
For mobile devices, use the `intent_uri` to directly launch the customer's UPI application. This provides a seamless experience without manual data entry.
##### 1. Specific App Invocation (Android & iOS)
To target a specific app, use the following schemes:
| UPI App | Android Package Name (for Intent URL) | iOS URL Scheme Prefix |
| ---------- | ---------------------------------------- | ---------------------- |
| Google Pay | `com.google.android.apps.nbu.paisa.user` | `gpay://upi/pay?` |
| PhonePe | `com.phonepe.app` | `phonepe://upi/pay?` |
| BHIM | `in.org.npci.upiapp` | `bhim://upi/pay?` |
| Paytm | `net.one97.paytm` | `paytmmp://upi/pay?` |
| Amazon Pay | `in.amazon.mShop.android.shopping` | `amazonpay://upi/pay?` |
| CRED | `com.dreamplug.androidapp` | `credpay://upi/pay?` |
| Supermoney | `money.super.payments` | `super://pay?` |
| Fi Money | `com.fi.money` | `fi://upi/pay?` |
| Jupiter | `money.jupiter` | `jupiter://upi/pay?` |
| Slice | `indwin.c3.shareapp` | `slice://upi/pay?` |
**Android Specific App Format:**
```
intent://pay?#Intent;scheme=upi;package=;end;
```
**Examples:**
```text Google Pay theme={null}
intent://pay?pa=merchant@bank&pn=Merchant&am=1.00&cu=INR&tr=TXN123#Intent;scheme=upi;package=com.google.android.apps.nbu.paisa.user;end;
```
```text PhonePe theme={null}
intent://pay?pa=merchant@bank&pn=Merchant&am=1.00&cu=INR&tr=TXN123#Intent;scheme=upi;package=com.phonepe.app;end;
```
```text BHIM theme={null}
intent://pay?pa=merchant@bank&pn=Merchant&am=1.00&cu=INR&tr=TXN123#Intent;scheme=upi;package=in.org.npci.upiapp;end;
```
```text Paytm theme={null}
intent://pay?pa=merchant@bank&pn=Merchant&am=1.00&cu=INR&tr=TXN123#Intent;scheme=upi;package=net.one97.paytm;end;
```
**iOS Specific App Format:**
```
```
**Examples:**
```text Google Pay theme={null}
gpay://upi/pay?pa=merchant@bank&pn=Merchant&am=1.00&cu=INR&tr=TXN123
```
```text PhonePe theme={null}
phonepe://upi/pay?pa=merchant@bank&pn=Merchant&am=1.00&cu=INR&tr=TXN123
```
```text BHIM theme={null}
bhim://upi/pay?pa=merchant@bank&pn=Merchant&am=1.00&cu=INR&tr=TXN123
```
```text Paytm theme={null}
paytmmp://upi/pay?pa=merchant@bank&pn=Merchant&am=1.00&cu=INR&tr=TXN123
```
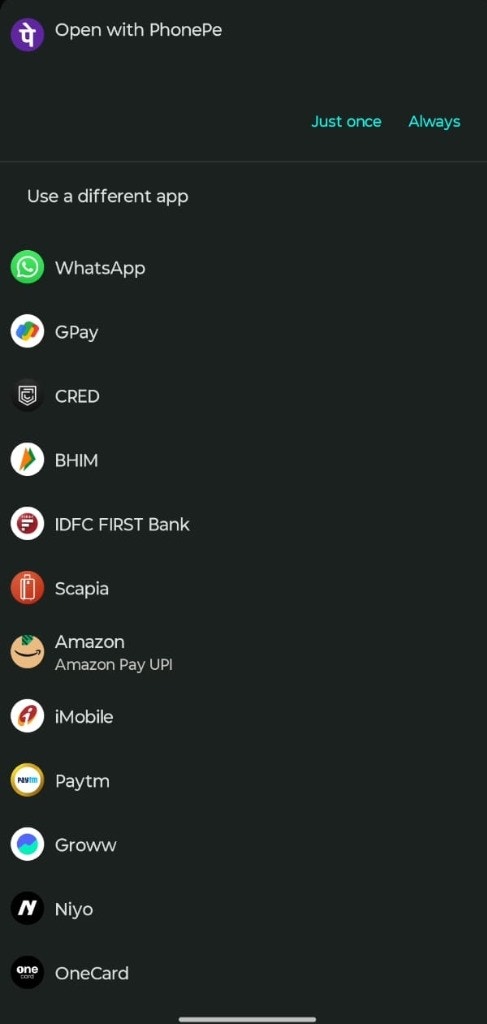
##### 2. Generic Intent Invocation
If you want to allow the user to choose from any available UPI app or use their default handler, use the following scheme:
| Type | Scheme Prefix | Description |
| --------------- | ------------- | ----------------------------------------- |
| **General UPI** | `upi://pay?` | Launches the system's default UPI handler |
**Example:**
```text theme={null}
upi://pay?pa=merchant@bank&pn=Merchant&am=1.00&cu=INR&tr=TXN123
```
* **On Android**: Invoking `upi://pay?` will open the system's app tray (the "Complete action using" dialog), allowing the buyer to select from all installed UPI apps.
For mobile devices, design a list of popular UPI apps (like Google Pay, PhonePe, Paytm) for the buyer to select from. This provides the best user experience.
## Step 2: Initiate Payment
When the user clicks on a specific UPI app icon (e.g., Google Pay) on mobile or selects "Show QR" on desktop, your backend should call this API to generate the `intent_uri`.
#### Sample UPI Intent Request Body
```json theme={null}
{
"amount": "1000.00",
"collection_mode": "s2s",
"upi_flow_type": "intent",
"currency": "INR",
"reference_id": "S2SI_U8MEIT",
"mop_type": "upi",
"buyer": {
"name": "John Doe",
"email": "john.doe@example.com",
"phone": "+919876543210",
"address": {
"line_1": "123 Main Street",
"line_2": "Apt 4B",
"city": "City",
"state": "State",
"postal_code": "123456"
},
"ip_address": "192.168.1.100",
"user_agent": "Mozilla/5.0 (Windows NT 10.0; Win64; x64) AppleWebKit/537.36 (KHTML, like Gecko) Chrome/91.0.4472.124 Safari/537.36"
},
"product": {
"name": "Sample Product",
"description": "This is a sample product description",
"hs_code": "98051000",
"hs_code_description": "Portable automatic data processing machines",
"type_of_goods": "physical_goods"
},
"invoice": {
"number": "INV_V9TZZ3",
"date": "2025-07-08"
}
}
```
For the S2S UPI Intent request, you must include these additional parameters beyond the standard checkout fields:
* `collection_mode`: must be set to `"s2s"`
* `upi_flow_type`: must be set to `"intent"`
* `buyer.ip_address`: the customer’s device IP address
* `buyer.user_agent`: the customer’s browser or app user-agent string
### S2S UPI Intent Response
```json theme={null}
{
"success": true,
"message": "S2S UPI Request created successfully",
"data": {
"intent_uri": "pa=kk.payutest@hdfcbank&pn=&tr=403993715534292371&tid=PPPL403993715534292371080725205418&am=1000.00&cu=INR&tn=UPIIntent",
"order_id": "OD2000992103"
}
}
```
For S2S UPI Intent mode, the response includes:
* `order_id`: Unique order identifier
* `intent_uri`: UPI intent link that can be used to open UPI apps directly
**Explanation of URL Arguments**
| Argument | Example Value | Required | Description |
| -------- | --------------- | -------- | ------------------------------------------------------------------------------------------------ |
| `pa` | `merchant@bank` | Yes | Payee VPA (Virtual Payment Address) — the merchant's UPI ID that will receive the payment |
| `pn` | `Merchant Name` | Yes | Payee Name — the display name of the merchant |
| `am` | `100.00` | No | Amount — the payment amount (decimal, up to two places) |
| `cu` | `INR` | Yes | Currency — must be `INR` for Indian rupees |
| `tr` | `TXN12345` | Yes | Transaction Reference ID — unique identifier for this transaction (for reconciliation) |
| `tid` | `TXNID98765` | No | Transaction ID — a unique transaction ID (sometimes required by specific apps, e.g., Google Pay) |
| `tn` | `Order Payment` | No | Transaction Note — a short note or description for the payment |
## Step 3: Invoke UPI Intent
The method for invoking a UPI payment depends on the customer's device and operating system.
#### Desktop (PC)
On desktop browsers, use the `intent_uri` to generate a **QR Code**. The user can then scan this code with their mobile UPI app to complete the payment.
**Implementation:**
1. Prefix the `intent_uri` with `upi://pay?`
2. Use a QR code generation library or API to convert the full URI into a QR code image.
3. Display the QR code prominently with instructions like "Scan to Pay".
***PC Specific App Format***:
```text theme={null}
upi://pay?
```
**Examples:**
```text theme={null}
upi://pay?pa=merchant@bank&pn=Merchant&am=1.00&cu=INR&tr=TXN123
```
#### Mobile (Android & iOS)
For mobile devices, use the `intent_uri` to directly launch the customer's UPI application. This provides a seamless experience without manual data entry.
##### 1. Specific App Invocation (Android & iOS)
To target a specific app, use the following schemes:
| UPI App | Android Package Name (for Intent URL) | iOS URL Scheme Prefix |
| ---------- | ---------------------------------------- | ---------------------- |
| Google Pay | `com.google.android.apps.nbu.paisa.user` | `gpay://upi/pay?` |
| PhonePe | `com.phonepe.app` | `phonepe://upi/pay?` |
| BHIM | `in.org.npci.upiapp` | `bhim://upi/pay?` |
| Paytm | `net.one97.paytm` | `paytmmp://upi/pay?` |
| Amazon Pay | `in.amazon.mShop.android.shopping` | `amazonpay://upi/pay?` |
| CRED | `com.dreamplug.androidapp` | `credpay://upi/pay?` |
| Supermoney | `money.super.payments` | `super://pay?` |
| Fi Money | `com.fi.money` | `fi://upi/pay?` |
| Jupiter | `money.jupiter` | `jupiter://upi/pay?` |
| Slice | `indwin.c3.shareapp` | `slice://upi/pay?` |
**Android Specific App Format:**
```
intent://pay?#Intent;scheme=upi;package=;end;
```
**Examples:**
```text Google Pay theme={null}
intent://pay?pa=merchant@bank&pn=Merchant&am=1.00&cu=INR&tr=TXN123#Intent;scheme=upi;package=com.google.android.apps.nbu.paisa.user;end;
```
```text PhonePe theme={null}
intent://pay?pa=merchant@bank&pn=Merchant&am=1.00&cu=INR&tr=TXN123#Intent;scheme=upi;package=com.phonepe.app;end;
```
```text BHIM theme={null}
intent://pay?pa=merchant@bank&pn=Merchant&am=1.00&cu=INR&tr=TXN123#Intent;scheme=upi;package=in.org.npci.upiapp;end;
```
```text Paytm theme={null}
intent://pay?pa=merchant@bank&pn=Merchant&am=1.00&cu=INR&tr=TXN123#Intent;scheme=upi;package=net.one97.paytm;end;
```
**iOS Specific App Format:**
```
```
**Examples:**
```text Google Pay theme={null}
gpay://upi/pay?pa=merchant@bank&pn=Merchant&am=1.00&cu=INR&tr=TXN123
```
```text PhonePe theme={null}
phonepe://upi/pay?pa=merchant@bank&pn=Merchant&am=1.00&cu=INR&tr=TXN123
```
```text BHIM theme={null}
bhim://upi/pay?pa=merchant@bank&pn=Merchant&am=1.00&cu=INR&tr=TXN123
```
```text Paytm theme={null}
paytmmp://upi/pay?pa=merchant@bank&pn=Merchant&am=1.00&cu=INR&tr=TXN123
```
##### 2. Generic Intent Invocation
If you want to allow the user to choose from any available UPI app or use their default handler, use the following scheme:
| Type | Scheme Prefix | Description |
| --------------- | ------------- | ----------------------------------------- |
| **General UPI** | `upi://pay?` | Launches the system's default UPI handler |
**Example:**
```text theme={null}
upi://pay?pa=merchant@bank&pn=Merchant&am=1.00&cu=INR&tr=TXN123
```
* **On Android**: Invoking `upi://pay?` will open the system's app tray (the "Complete action using" dialog), allowing the buyer to select from all installed UPI apps.
 * **On iOS**: Invoking `upi://pay?` will directly open the default UPI app configured on the device.
**Pro Tip:** For the best user experience, detect the user's device type. Show a QR code on Desktop and a list of UPI apps (or a "Pay via UPI" button) on Mobile.
### Step 3: Check UPI Transaction Status
Invoke the **Order Status API** to retrieve the status of the UPI transaction:
```bash [expandable] theme={null}
curl -X GET https://api-pacb.eximpe.com/pg/orders/{order_id}/status/ \
-H "X-Client-ID: YOUR_CLIENT_ID" \
-H "X-Client-Secret: YOUR_CLIENT_SECRET" \
-H "X-API-Version: 1.0.0"
```
For detailed parameters and response formats, see the [Get Order API](https://docs.eximpe.com/api-reference/order/get)
### Step 4: EximPe sends webhook response
EximPe can also send a webhook response whenever the transaction status gets updated.
For more information, see the [Payment Successful response](https://docs.eximpe.com/api-reference/webhooks/payment-successful)
***
* **On iOS**: Invoking `upi://pay?` will directly open the default UPI app configured on the device.
**Pro Tip:** For the best user experience, detect the user's device type. Show a QR code on Desktop and a list of UPI apps (or a "Pay via UPI" button) on Mobile.
### Step 3: Check UPI Transaction Status
Invoke the **Order Status API** to retrieve the status of the UPI transaction:
```bash [expandable] theme={null}
curl -X GET https://api-pacb.eximpe.com/pg/orders/{order_id}/status/ \
-H "X-Client-ID: YOUR_CLIENT_ID" \
-H "X-Client-Secret: YOUR_CLIENT_SECRET" \
-H "X-API-Version: 1.0.0"
```
For detailed parameters and response formats, see the [Get Order API](https://docs.eximpe.com/api-reference/order/get)
### Step 4: EximPe sends webhook response
EximPe can also send a webhook response whenever the transaction status gets updated.
For more information, see the [Payment Successful response](https://docs.eximpe.com/api-reference/webhooks/payment-successful)
***